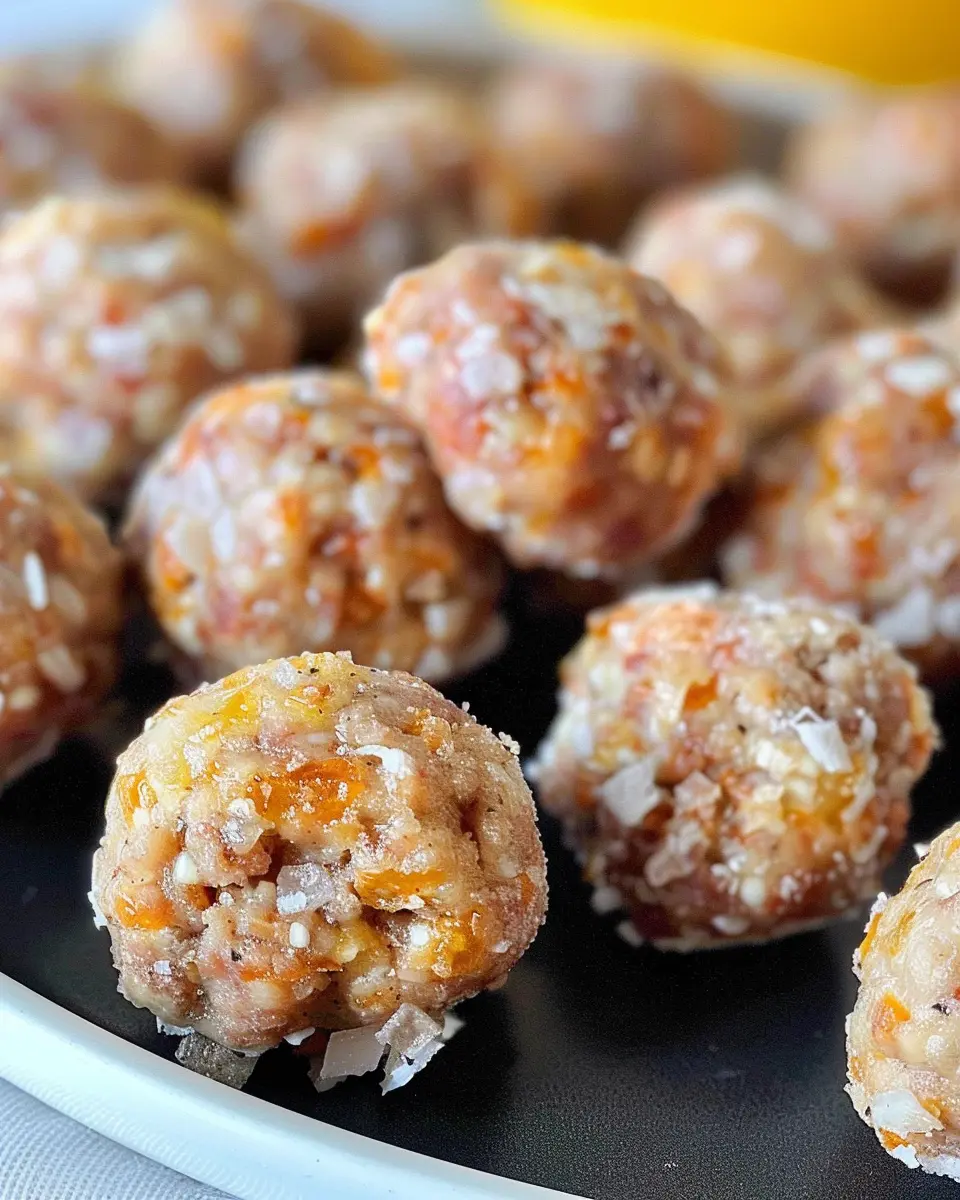
Introduction to Bisquick Sausage Balls
If you’re a young professional juggling a bustling schedule, you know how valuable it is to have quick, crowd-pleasing snacks on hand. Enter Bisquick sausage balls—these little bites of joy are not only delicious but also incredibly easy to whip up. With just a few ingredients and minimal prep time, they can transform your snack game from mundane to marvelous in no time.
Why should you consider adding bisquick sausage balls to your recipe repertoire? First and foremost, they’re the perfect on-the-go treat for those busy mornings or casual get-togethers with friends. Imagine having a savory snack ready to grab as you head out the door or something delightful to share at your next potluck. They appeal to a broad range of tastes, allowing you to customize them easily. Whether you choose to make them with traditional beef sausage or even go for turkey bacon or chicken ham, the variations are endless.
Cooking them is a breeze! All you need is one bowl and a little time in the oven, making it a low-effort, high-reward recipe. Plus, they stay fresh in the fridge for a few days, making meal prep a lot smoother. In a world where convenience matters, having something like bisquick sausage balls on hand can save you from unhealthy snacking choices.
Speaking of convenience, the best part is that they can be enjoyed at any time of the day. Have them for breakfast alongside a hot cup of coffee, serve them at brunch with a fresh fruit salad, or even enjoy them as an evening snack while catching up on your favorite series.
With their versatility and mouth-watering flavor, it’s no wonder that bisquick sausage balls have become a staple for many young professionals. They are not just a snack; they’re an experience that brings friends and family together. So, are you ready to dive into the deliciousness? Let’s explore how to make the best bisquick sausage balls ever!

Ingredients for Bisquick Sausage Balls
Making Bisquick sausage balls is a fun and delicious way to enjoy a savory snack that’s perfect for gatherings or just a cozy night in. Let’s dive into the key ingredients you’ll need to whip up these tasty bites!
Essential Ingredients
To get started on your Bisquick sausage balls, gather the following essentials:
- 1 pound of beef sausage: Look for a flavor that you love, whether it’s spicy or mild.
- 2 cups of Bisquick mix: This is your base for binding everything together.
- 1 cup of shredded cheese: Cheddar is a classic choice, but feel free to experiment!
- 1/2 cup of milk: This adds moisture and richness to the mixture.
Optional Ingredients for Extra Flavor
Want to elevate your bisquick sausage balls? Consider adding these optional ingredients:
- Chopped green onions: Adds a lovely freshness.
- Diced turkey bacon or chicken ham: For a smoky, savory twist.
- Garlic powder or onion powder: Perfect for flavor enthusiasts.
- Hot sauce or spices: If you’re feeling adventurous, a pinch can kick up the heat!
These ingredients boost flavor and can really tailor the recipe to your tastes. For more inspiration, check out The Spruce Eats for other creative variations! Happy cooking!
Step-by-Step Preparation for Bisquick Sausage Balls
Making Bisquick sausage balls can be a delightful culinary adventure, even for those who may not consider themselves seasoned chefs. This simple recipe is perfect for any occasion, whether you’re prepping for a weekend brunch, a game day, or just a fun snack while binge-watching your favorite series. Ready to dive into the process? Let’s get started!
Preheat the Oven
Begin by preheating your oven to 375°F (190°C). Preheating is crucial as it ensures that your sausage balls cook evenly and develop that delicious golden-brown exterior we all love. Plus, as the oven warms up, the mouthwatering aroma of the sausages and cheese will start filling your kitchen, making it even more enticing.
Combine the Ingredients in a Mixing Bowl
In a large mixing bowl, combine the following ingredients:
- 1 pound ground sausage (you can use beef sausage for a leaner option)
- 2 cups Bisquick mix
- 1 cup shredded cheddar cheese
- 1/4 cup milk
- 1/4 teaspoon garlic powder
- 1/4 teaspoon black pepper
You can get creative here! Some folks like adding diced green onions or even a pinch of cayenne pepper for a bit of kick.
Using your hands or a spatula, gently mix everything together until just combined. Be careful not to overmix; doing so might make your sausage balls tough. The ultimate goal here is to have a homogenous mixture that retains some texture, ensuring those delicious cheesy pockets remain when you bake them.
Need some extra help with measurements? Check out Bon Appétit’s cooking guides for excellent tips on ingredient quantities.
Form the Sausage Mixture into Balls
Now comes the fun part! Scoop out small portions of the sausage mixture, rolling them between your palms to form uniform balls about 1 inch in diameter. You can even involve your friends in this step for a fun little assembly line; it can be an excellent way to keep the mood light while preparing your food.
A pro tip: if you find the mixture sticking to your hands, wetting your palms slightly can help.
Arrange the Sausage Balls on a Baking Sheet
Once you have your balls ready, it’s time to arrange them on a baking sheet. Line the baking sheet with parchment paper for easy cleanup and fantastic results. Space the bisquick sausage balls about an inch apart to allow them some room for expansion as they bake.
At this point, you might want to brush the tops lightly with a bit of butter or olive oil for that extra crispy finish.
Bake and Enjoy the Aroma
Slide the baking sheet into your preheated oven and bake for about 20-25 minutes, or until the balls are golden brown and cooked through. You’ll know they’re done when your kitchen is filled with a mouthwatering aroma that’ll make even the pickiest eaters start to drool.
As they bake, take a moment to enjoy the transformation happening in your kitchen. The sizzling sound combined with the heavenly scent is a reminder of how cooking can be both a science and an art.
Once they’re done, let the sausage balls cool for a few minutes before diving in. Serve them warm with your favorite dipping sauce – a simple ranch or honey mustard works wonders!
By following these steps, you’re not just making bisquick sausage balls, but you’re also creating a moment to share with friends or family. Enjoy every bite! For even more ideas on dips or side dishes, don’t forget to explore Food Network’s website for inspiration.

Variations on Bisquick Sausage Balls
When it comes to Bisquick sausage balls, the classic recipe is undeniably delicious, but why stop there? With a few simple tweaks, you can create variations that cater to different tastes and dietary preferences. Let’s explore some fun adaptations!
Spicy Bisquick Sausage Balls
If you like a little heat, this version is for you!
- Substitute: Use spicy Italian sausage or add crushed red pepper flakes to the mixture.
- Extras: Consider mixing in some diced jalapeños or a dash of your favorite hot sauce for that extra zing.
Your guests will never see it coming, and they might just ask for more!
Cheesy Herb Bisquick Sausage Balls
For cheese lovers, this variation elevates the flavor profile and adds a delightful texture.
- Cheese: Mix in some shredded cheddar or pepper jack cheese to the dough for a gooey surprise in every bite.
- Herbs: Fresh herbs like parsley, dill, or chives can bring a bright note to these savory treats.
Cheesy herb Bisquick sausage balls are perfect for brunch or as a snack during game day!
Veggie-Enhanced Bisquick Sausage Balls
Want to sneak in some veggies? This option adds nutrition and a hint of color.
- Additions: Finely grated zucchini or carrots can be folded into the mix without compromising flavor.
- Mushrooms: Chopped, sautéed mushrooms can also enhance the savory flavor while keeping the texture moist.
These veggie-enhanced Bisquick sausage balls are a great way to satisfy your health-conscious friends without sacrificing taste.
Feel free to experiment—add your twist to these variations! For more inspiration and tips, check out sites like Bon Appétit or Food Network. Happy cooking!
Cooking Tips and Notes for Bisquick Sausage Balls
How to Achieve the Perfect Texture
To get the perfect texture for your bisquick sausage balls, be cautious about over-mixing. Combine the ingredients just until blended; this helps maintain a tender bite. A helpful trick is to use cold ingredients, especially the turkey bacon or any meat substitute—this will keep the balls from becoming dense. If you want extra flavor, consider adding grated cheese or finely chopped herbs to the mix.
Common Mistakes to Avoid
There are a few common pitfalls to dodge when preparing these delightful bisquick sausage balls:
- Skipping the chilling step: Refrigerate your mixture for about 30 minutes before baking. This allows the flavors to meld beautifully and makes the mixture easier to handle.
- Not checking for doneness: Every oven varies, so keep an eye on them toward the end of baking. They should be golden brown.
If you want to delve deeper into variations and deeper cooking techniques, you might find this cooking guide helpful!
Remember, practice makes perfect, and these bisquick sausage balls are a fun project to master!

Serving Suggestions for Bisquick Sausage Balls
Pairing with Dipping Sauces
When it comes to bisquick sausage balls, the right dipping sauce can elevate your snacking experience. Consider serving them with:
- Honey mustard for a sweet and tangy kick.
- Buffalo sauce for those who love a spicy twist.
- Ranch dressing for a classic and creamy pairing.
Feel free to mix and match or even create your own signature sauces. A quick search on Food Network can give you inspiration for fun flavor combinations!
Including in a Brunch Spread
Bisquick sausage balls fit wonderfully into a brunch spread. They can be the star of the table alongside:
- Fresh fruit platters for a refreshing balance.
- Turkey bacon or chicken ham as savory accompaniments.
- Scrambled eggs for a hearty start to the day.
Imagine serving these delectables at your next gathering—who wouldn’t love warm sausage balls fresh from the oven? They’re easy to transport, making them perfect for brunch potlucks or lazy Sunday mornings at home. So, gather your friends and enjoy these tasty bites as part of a delightful meal!
Time Breakdown for Bisquick Sausage Balls
Preparation Time
Making Bisquick sausage balls is joyfully uncomplicated! You’ll need about 15 minutes to gather your ingredients and mix everything together. A tip: have your measuring cups and mixing bowl at the ready to streamline the process.
Cooking Time
Once you’re prepped, pop those flavorful orbs into the oven! The cooking time is approximately 20 minutes at the recommended temperature. While they bake, you can tidy up or get ready for your guests.
Total Time
All in all, you’re looking at about 35 minutes from start to finish. Perfect for those busy weekdays or spontaneous get-togethers! These tasty bites are just a short wait away, making them an instant favorite. For more details on timing variations, check out The Kitchn for helpful insights.
So, who’s ready to indulge in freshly baked Bisquick sausage balls?
Nutritional Facts for Bisquick Sausage Balls
When you’re whipping up a batch of Bisquick sausage balls, it’s helpful to consider their nutritional profile. Here’s a quick breakdown to help you make informed choices for your next gathering or snack!
Calories
Each bisquick sausage ball packs approximately 150 calories, making it a satisfying yet mindful indulgence.
Protein
These delightful bites offer around 7 grams of protein each, which is fantastic for fueling your day, especially if you’re hitting the gym or need a midday energy boost.
Sodium
On the flip side, be mindful of the sodium content, which can be around 350 milligrams per serving. If you’re watching your intake, consider opting for reduced sodium sausage options or pairing them with a fresh salad to balance things out.
For additional nutritional insights on sausage ingredients, you can check out the U.S. Department of Agriculture for more detailed information. Enjoy your cooking adventure!
FAQs about Bisquick Sausage Balls
Can I freeze Bisquick Sausage Balls?
Absolutely! Freezing Bisquick sausage balls is a fantastic way to have an easy appetizer ready at a moment’s notice. Simply bake them as directed, let them cool completely, and then place them in an airtight container or freezer bag. They can be stored in the freezer for up to three months. When you’re ready to enjoy them, just thaw in the refrigerator overnight and reheat in the oven for a crispy finish.
What are the best dipping sauces?
When it comes to dipping sauces for your Bisquick sausage balls, the options are almost limitless! Here are a few crowd-pleasers:
- Honey Mustard: The sweet and tangy profile pairs perfectly with savory flavors.
- Barbecue Sauce: Adds a smoky, sweet kick that complements the beef sausage.
- Ranch Dressing: Creamy and cool, ranch is always a hit.
- Creamy Chipotle Sauce: For those who enjoy a spicy twist, this sauce brings the heat.
Feel free to experiment with other sauces too. Ever tried them with a sriracha mayo? Delicious!
How do I store leftovers?
If you find yourself with leftovers (though that’s a rare occurrence), it’s vital to store them properly. Place the cooled Bisquick sausage balls in an airtight container in the fridge. They can last up to four days. To reheat, simply pop them in the oven for about 10 minutes at 350°F for a taste that’s almost as good as fresh out of the oven. Remember, they also make a great addition to breakfast or brunch the next day!
For more tips and recipes, check out Food Network or Bon Appétit for inspiration. Happy cooking!
Conclusion on Bisquick Sausage Balls
Why You Should Try Making Bisquick Sausage Balls Today
If you’re on the hunt for a quick, delicious snack that’s perfect for any occasion, bisquick sausage balls should definitely be on your radar. These bite-sized delights are not only simple to whip up, but they also boast a fantastic flavor combination thanks to the savory beef and cheesy goodness.
Imagine serving them at your next gathering or enjoying them as a cozy breakfast treat with a warm cup of coffee. It’s all about convenience without sacrificing taste! Plus, you can explore various meat options like turkey bacon or chicken ham, adding a personal twist. So why not give them a try today? You won’t regret it! And for more delicious snack ideas, check out this great article from Food Network.
PrintBisquick Sausage Balls: Easy Recipe with Turkey Bacon and Beef

These Bisquick Sausage Balls are a quick and delicious snack made with turkey bacon and beef.
- Prep Time: 10 minutes
- Cook Time: 25 minutes
- Total Time: 35 minutes
- Yield: 24 balls 1x
- Category: Snack
- Method: Baking
- Cuisine: American
- Diet: Omnivore
Ingredients
- 1 cup Bisquick mix
- 1 pound ground beef
- 1/2 cup cooked turkey bacon, chopped
- 1 cup shredded cheddar cheese
- 1/4 cup milk
- 1 teaspoon garlic powder
- 1/2 teaspoon black pepper
Instructions
- Preheat the oven to 350°F (175°C).
- In a mixing bowl, combine Bisquick, beef, turkey bacon, cheese, milk, garlic powder, and black pepper until well mixed.
- Roll the mixture into 1-inch balls and place on a baking sheet.
- Bake for 20-25 minutes or until golden brown.
- Remove from the oven and let cool slightly before serving.
Notes
- For extra flavor, add some chopped onions or bell peppers to the mixture.
- These can be served with your favorite dipping sauce.
Nutrition
- Serving Size: 2 balls
- Calories: 200
- Sugar: 1g
- Sodium: 450mg
- Fat: 12g
- Saturated Fat: 5g
- Unsaturated Fat: 6g
- Trans Fat: 0g
- Carbohydrates: 14g
- Fiber: 1g
- Protein: 10g
- Cholesterol: 45mg
Keywords: Bisquick Sausage Balls, Easy Recipe, Turkey Bacon, Beef